home recipe index outside the kitchen links about contact

Monday, May 23, 2011

Fiery Fish Tacos with Crunchy Corn Salsa


Have you ever been to Rubio's? Probably the finest fish taco to ever grace the Earth, especially on Tuesdays when they are half off. Well, these fish tacos are absolutely nothing like the tacos at Rubios, but they are still delicious! My very favorite part of these tacos is the jicima salsa. Jicima is a slightly sweet, crunchy, delicious little ...thing. Growing up my Grandma would always have jicama on hand and peel and slice it for a sweet little afternoon snack when we would visit. It compliments these spicy tacos perfectly. And don't be afraid, you can easily control the heat in these tacos to suit your tastes.

I also kind of feel like I should note something here. Well, two things, one is that I only own white plates and bowls. It's a sad little life to be such a cheapskate, but I just want to get that out in the open so we can all move on. The second thing is that...notice how there is nothing else on the plate besides the tacos? That's totally the norm at our house. I'm proud that we rarely eat things like soup from a can, grilled cheese, etc. but making things that take more than ten minutes to prepare means that we usually just get a main course. Occasionally some bread or a vegetable, never anything too thrilling.

I really wanted to just make German pancakes for dinner tonight, but I have a husband who is staunchly opposed to breakfast for dinner (pity me, please). Anyway, hope you enjoy these tacos!


Fiery Fish Tacos with Crunchy Corn Salsa


adapted slightly from http://www.allrecipes.com/
1 cup corn
1/2 cup diced red onion
1 cup peeled, chopped jicama
1/2 cup diced red bell pepper
1 cup fresh cilantro leaves, finely chopped
1 lime, zested and juiced
1 tablespoons sour cream
1 tablespoon cayenne pepper
1/2 tablespoon ground black pepper
1 tablespoon salt
6 (4oz) tilapia fillets
2 tablespoons olive oil
12 corn tortillas, warmed (I spray a pan with pam and slightly toast on both sides)

Preheat grill to high heat. In a medium bowl, mix together corn, red onion, jicama, red bell pepper, and cilantro. Stir in lime juice and zest. In a small bowl, combine cayenne pepper, black pepper, and salt. Brush each fillet with olive oil, and sprinkle with spices. Arrange fillets on grill grate (or on George Foreman) and cook for three minutes per side. For each taco, top corn tortilla with fish, sour cream, and corn salsa.

Kristi's Notes: Be pretty sparing with the spice rub, even if you like the heat. We like spicy in this house and I probably only used a third of this spice mixture, if that. For the kids tacos I threw some fish on with just the salt and none of the spice rub.

Sunday, May 22, 2011

Balsamic Chicken Pasta with Fresh Cheese


I like to think I am the kind of person who will try anything once. I am also the kind of person who really likes cheese (with the exception of blue cheese, due to an unfortunate incident while I was pregnant that I prefer to not talk about. At least on a recipe blog. *shudder*). I think I had tried little crumbles of goat cheese before and it seemed pretty gross to me. Perhaps a little bit too much like blue cheese for comfort. This dish, however, not only has me buying goat cheese, it has me buying goat cheese from Costco, and frequently from Costco at that. Which is really saying something! This pasta is one of the finest pastas around, it's easy to make, has a unique flavor, and I just can't get enough of it!

Balsamic Chicken Pasta with Fresh Cheese

by: www.perrysplate.com

2 T balsamic vinegar
3 garlic cloves, minced
1/2 tsp salt
1/4 tsp pepper
6 T extra virgin olive oil
1 c fresh basil leaves, thinly sliced
2 c shredded cooked chicken
1 red bell pepper, julienned
1 c small fresh mozzarella balls, halved or cubed mozzarella (3/4 inch)
1/2 c crumbled soft goat cheese
8 oz linguine ( I would estimate that I only use the type of pasta called for in a recipe like 15% of the time, I just use what I have on hand. In this case it was fettuccine. But if I had to do it over again I would have used spaghetti noodles or something a little more...round)

Cook linguine according to package directions; drain. Saute bell pepper in a small skillet over medium heat until limp, about 10-12 minutes.

Meanwhile, whisk vinegar, garlic, salt and pepper in a small bowl; slowly whisk in oil. Stir in 1/2 c basil.

Place pasta, chicken, cooked peppers, mozzarella, goat cheese, and remaining basil in a large bowl. Pour dressing over top and toss to coat.

Kristi's Notes: I've messed around with this pasta quite a bit. Sometimes I use a rotisserie chicken from Costco, sometimes (usually) I omit the chicken all together and substitute in mushrooms (just slice them and throw them in when you cook the red pepper). I've also found that you can reduce the amount of oil in the sauce by about a tablespoon or two and it doesn't affect the taste of texture of the pasta much (I'm so ridiculously healthy...ha!). I hope you give this recipe a shot, it really is delicious. And I should note that you can buy goat cheese at Costco for much less than anywhere else. I've learned to even kind of, sort of, slightly like goat cheese on other things too. Baby steps.

Friday, May 20, 2011

Chocolate Drizzled Strawberries and Cream Pie


I was really happy to see this recipe pop up a few weeks ago. I love strawberries, and I love pies, but I have a thing about fruit pies. I haven't quite figured out if it is that I don't like warm fruit, I don't like cooked fruit, or if I just don't like mushy pureed fruit. Probably a combination of all of the above. So this pie was perfect for me, plus it turned out beautifully (which you would know if I could take a decent picture, I'm working on it - promise). With strawberries as beautiful and cheap as they are right now, and such an easy delicious recipe, you should give it a try! I also made a delicious strawberry soup the other day, it was divine, but I forgot to take a picture, whoops!

Chocolate-Drizzled Strawberries and Cream Pie
Recipe by Our Best Bites

1 quart fresh strawberries (frozen’s not gonna cut it here)
1 8-oz. package cream cheese at room temperature (light is fine)
1/2 teaspoon vanilla extract
1/4 cup packed light brown sugar
1 cup heavy whipping cream
1/4 cup powdered sugar
1 9″ graham cracker crust (store-bought or homemade, I have the easiest and best graham cracker crust recipe that I will post soon, I will be so disappointed if you ever buy a crust again)
1-2 ounces chocolate

In a medium bowl, beat the softened cream cheese, brown sugar, and vanilla until light and fluffy. In a separate large bowl, beat the whipping cream and powdered sugar until medium peaks form. Add about 1 c. of the whipping cream mixture to the cream cheese mixture. Beat until smooth and well-combined. Add the remaining whipping cream mixture and mix until just combined. Spread in the graham cracker crust and refrigerate for a few minutes while you prepare the strawberries.

Wash the strawberries and cut off the stems. Blot dry with a paper towel and then gently press, cut side down, into the whipped cream mixture. Set aside.

If using a chocolate bar, break it into equal pieces and place in a small Ziploc bag. Microwave for 1-1 1/2 minutes, stopping the microwave every 20 seconds to mash the bag. You want the chocolate to be melted but not hot at all. When the chocolate is melted, snip a corner off the bag and drizzle it over the strawberries. Refrigerate for at least three hours before serving. Serves 8.


Living Basil


For four years now I have tried to grow my own garden. When I failed the first time I blamed it on the Texas sun and soil. We were living in Austin, TX and about an inch under the top layer of soil was solid Texas limestone. The second year in Texas, after mixing in new soil and trying really hard to grow tomatoes and basil (that's all I want, fresh tomatoes and basil), my garden still failed and I blamed it on the dogs, the sun, and bad luck. Now that I am back in Utah though I still have not had gardening success. It's sad really. Fresh herbs (aside from cilantro and parsley) are so expensive, but they make such a difference in a tasty meal.


I thought I would share with you a little tip. At certain stores around (I've seen them at WinCo and Harmons) you can buy living basil. It's a little plant of basil, and sure it costs more than a small package of fresh basil (not that much more), but it is a wise investment. This basil plant (which is starting to look very, very sad) has been sitting near a window in my kitchen for well over a month now. Every time I make a dish that has basil I just pluck a few leaves. It is so convenient! And sure eventually I overpick my plant and it dies, but that usually takes about two months to happen. So as long as I keep it watered and in decent sunlight I can have access to fresh basil for only about $2 a month. Way less stressful than gardening or buying tiny little packages of basil that could go bad before I use them. So check and see if your local store has living basil for sale, I totally recommend it!

Sweet Potato Foil Packet Tacos

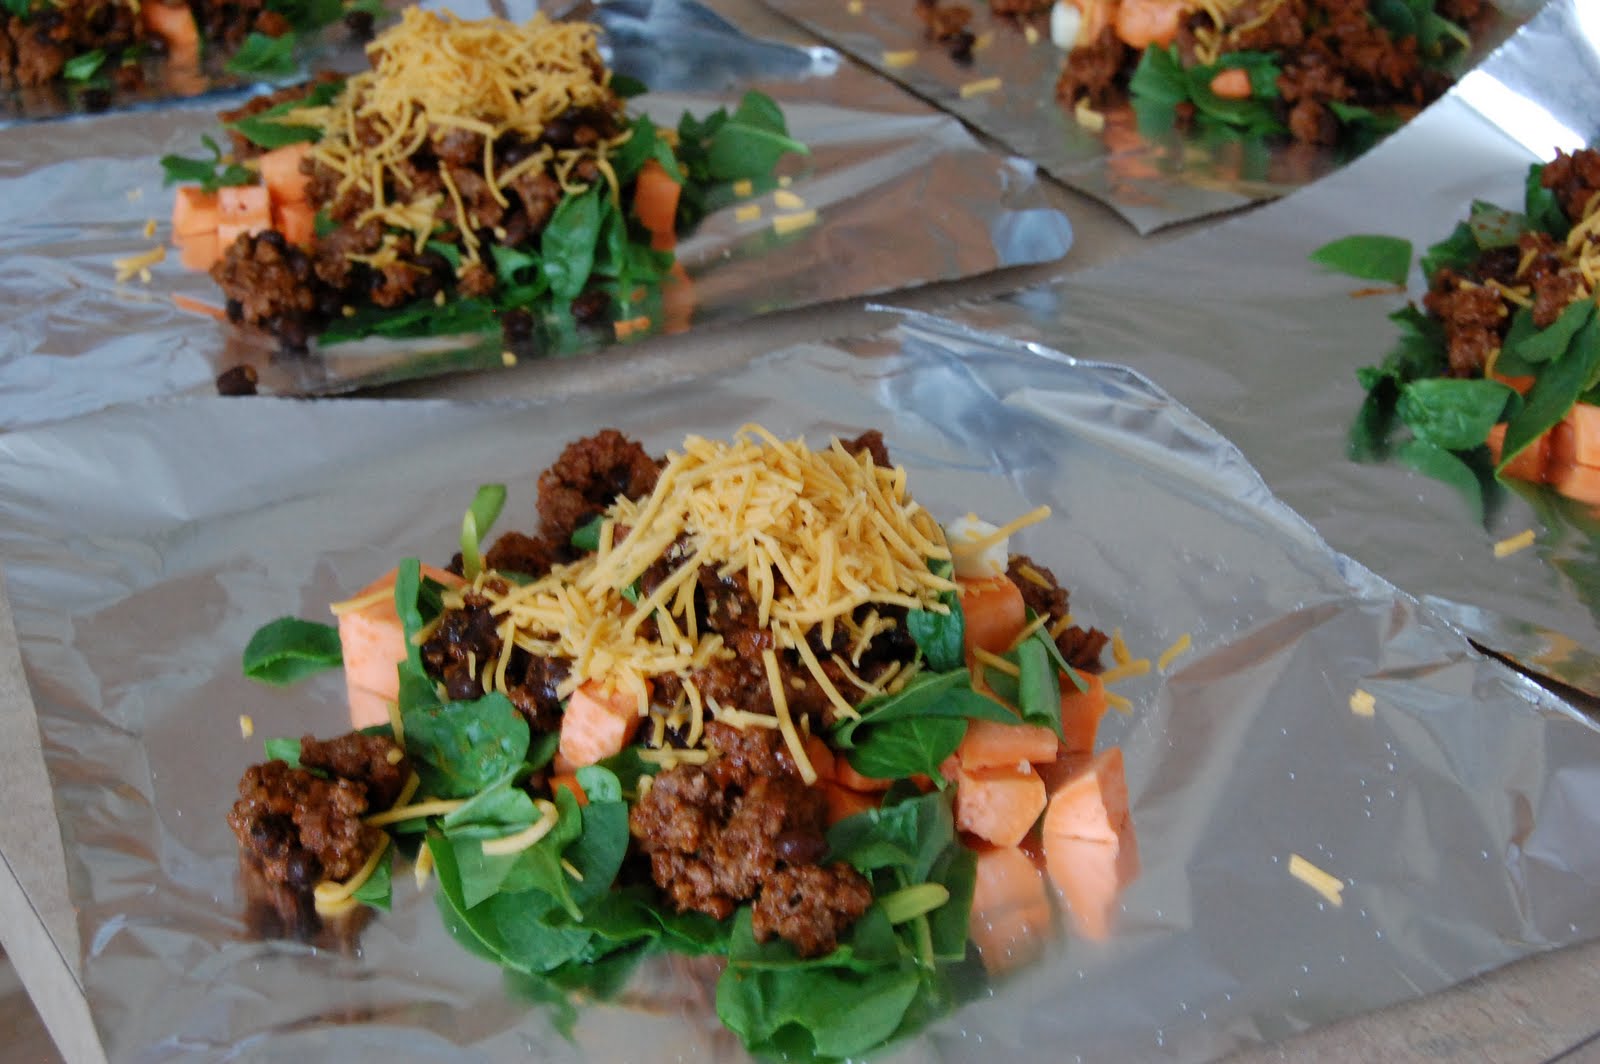
I'm an avid follower of perrysplate.com, her recipes are always delicious and full of good-for-you things, like spinach and sweet potatoes. The ingredients in these tacos don't seem like they would mesh together well, but man, they are a great combination! Hopefully we can use the "hobo dinner" cooking style to our advantage when we go camping this summer! You should definitely give these tacos a try for a fun twist on a traditional favorite!

Sweet Potato Foil Packet Tacos
by: www.perrysplate.com

Sweet Potato Foil Packet Tacos
by Natalie @ http://perrysplate.com

1/2 pound ground beef or turkey
2-3 tablespoons taco seasoning
1/2 cup tomato sauce (4 ounces)
1 can black, kidney, or pinto beans, drained
2-3 medium sweet potatoes, peeled and cut into 1/2-inch cubes (about 6 cups total)
2 tablespoons butter
salt
1 1/2 cups chopped fresh spinach
1 1/2 cups shredded cheddar cheese
sour cream, salsa, and/or guacamole for garnish
6 12-inch long pieces of aluminum foil

Preheat oven to 425 degrees F.

Brown ground meat in a skillet over medium-high heat. Stir in taco seasoning, tomato sauce, and beans. Set aside.

To assemble packets, spray the foil with non-stick spray. Place 1 cup sweet potato cubes in the center of each piece. Top with a small piece of butter (about 1 tsp) and a pinch or two of salt. Sprinkle some chopped spinach over the sweet potatoes, followed by about 1/3 cup of taco meat and sprinkle of cheese. Fold the sides in, then bring the top and bottom ends of the foil together in the center and fold, sealing the packet.

Repeat with remaining ingredients, placing the packets on a rimmed cookie sheet. Bake for 25-30 minutes until the sweet potatoes are tender.

Serve with sour cream, salsa, and/or guacamole.

Makes 6 servings.

Homemade Ranch Dressing

Maybe you are concerned about random ingredients in your food (MSG anyone?), or perhaps maybe dinner is in an hour and you don't have time to run to the store (have I complained yet about how I live in the middle of a fairly large city and yet I still must drive fifteen minutes to get to a grocery store?). Regardless of your reasoning, sometimes it is nice to be able to just whip up your own salad dressing. You probably have most of the ingredients on hand, and if you don't you probably wont be disappointed with a little improvisation.

Homemade Ranch Dressing


by: Janssen @ frugalwifewealthylife.blogspot.com

3/4 cup mayonnaise (light is fine)
3/4 cup sour cream (light is fine)
1 tablespoon olive oil
1 tablespoon lemon juice
1/4 cup parsley (this was the thing I did not have)
1 green onion (green part only)
1/2 teaspoon minced garlic
1/2 teaspoon salt
1/4 teaspoon black pepper
2 tablespoons - 1/2 cup buttermilk

Put all ingredients, except buttermilk, in the blender and process until smooth; add buttermilk until desired consistency is reached. Store in fridge for up to two weeks.

*Kristi's Notes: I had no parsley, but ironically I did have fresh basil so I threw in a couple of basil leaves in lieu of the parsley and enjoyed the results. Also I don't go through buttermilk so I usually keep some buttermilk powder on hand, or you can mix 1 cup milk with 1 tablespoon white vinegar or lemon juice and let it stand for five minutes. Another handy thing to note is that if you go to the store and buy Italian salad dressing, you can buy a two pack that has a cruet included for less than the cost of two Italian dressing packs. probably everyone in the world knew this already but me, but it was a happy day when I didn't have to store my homemade dressing in a canning jar anymore :)

Wednesday, May 18, 2011

Stuffed Pizza Rolls

When I originally posted about these stuffed pizza rolls on my old recipe blog, I sounded really bitter and kind of mad about them. I think I made them on a really rough day (translation: PMS), and I did a couple of things wrong, like using pre-shredded mozzarella cheese (translation: giant mess). In truth these little "pizza balls" as we call them, are awesome. I like them better than making a regular pizza for two reasons 1 - they are less messy for toddlers to eat than regular pizza and 2 - one of the biggest disputes that B and I have in our marriage is how much pizza sauce belongs on a pizza. For me, there can never be enough, for him even a little is too much. So these pizza balls solve that dilemma.

You can make these as easy (with a refrigerated pizza crust and sauce from a jar) or hard (homemade pizza dough and sauce) as you want. I haven't experimented with this, but I am guessing they would freeze well and be an easy meal to keep on hand in the freezer to just pop in the oven on a rough day.

Stuffed Pizza Rolls


by: www.ourbestbites.com

1 roll refrigerated pizza dough (or make your own)
pizza sauce (or make your own)
2 tablespoons grated parmesan cheese
1 tablespoon olive oil or melted butter
1/2 teaspoon garlic powder
1 teaspoon dried Italian seasoning
mozzarella cheese, cut in small cubes
pizza toppings of your choice: ie ham and pineapple, pepperoni, sausage, etc.

Preheat the oven to the heat specified on the pizza dough package (or recipe - usually about 400 degrees). Unroll your dough onto a lightly floured surface. pat or roll the dough so it is about 8". Cut the dough into about 24 squares with a pizza cutter (I'll just tell you right now that the best pizza cutter you will ever get can be purchased at your local Papa Murphy's for $5).

Place cheese and desired toppings on each square (not the sauce!). Just place enough toppings on each square so you have enough dough left to make a ball. When all of your dough sqaures have cheese and toppings on, carefully lift up each square and wrap the dough around the toppings. Pinch to make sure each ball is sealed shut and them place them seam side down in a lightly sprayed pie plate (or similar dish).

Brush the tops of the dough balls with olive oil or melted butter, then sprinkle with garlic and Italian seasonings and top with parmesan cheese (or in lieu of that you can just use garlic bread seasoning).

Cook for 15-20 minutes until golden brown on top. You may want to check after 10 minutes since cooking times may vary. Serve with warm pizza sauce.

Kristi's Notes: If you are local, the best garlic bread seasoning is Chef Tom's. I'll be honest, I'm not sure where my mom gets it from, but she gives it to me occasionally on holidays and I swear by it. I'm going to venture out and try making my own sometime soon though, stay tuned for that!